by Dmitry A. Kazakov
(mailbox@dmitry-kazakov.de)
| FUZZY MACHINE LEARNING FRAMEWORK |
by Dmitry A. Kazakov (mailbox@dmitry-kazakov.de) |
Graphical User Interface | ||
| with fuzzy graph-schemes | version 1.12 |
This program is free software: you can redistribute it and/or modify it under
the terms of the GNU General Public License as published by the Free Software
Foundation, either version 2 of the License, or (at your option) any later
version.
This program is distributed in the hope that it will be useful, but WITHOUT ANY
WARRANTY; without even the implied warranty of MERCHANTABILITY or FITNESS FOR A
PARTICULAR PURPOSE. See the
GNU General Public License
for more details.
You should have received a copy of the GNU General Public License along with
this program. If not, see
http://www.gnu.org/licenses.
Fuzzy machine learning framework downloading
page
![]()
The fuzzy machine learning frameworks comes with a cross-platform graphical user interface that gives you access to the most important components of the framework. The framework itself can be used with or without the interface. The interface provides:
This document is an introduction to the graphical user interface.
The machine learning projects are stored in a database. In order to use the graphical user interface successfully a database must be installed first. There is a wide range of the database engines supported. Two major categories of are:
An external database engine like MySQL might be more robust, but need to be installed. An ODBC driver must be installed and configured as well. Then a databank has to be created and made known to the driver.
SQLite engine requires no installation. The database is basically just one file.
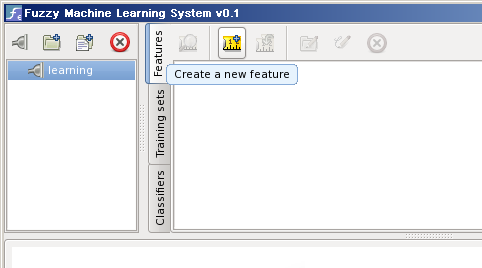
When you start the system for the first time, it looks like this:
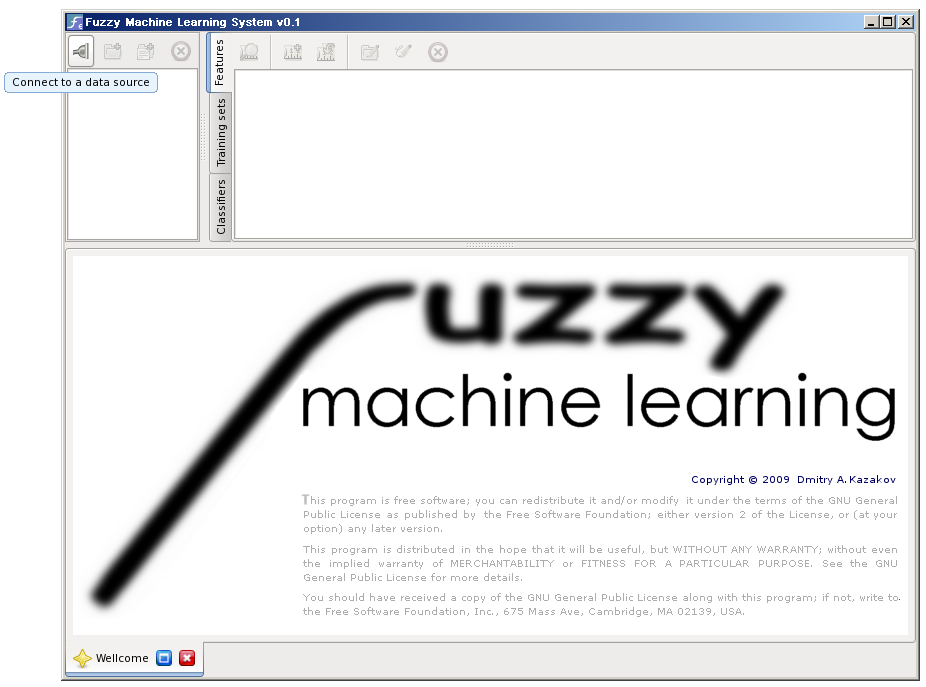
Note that the appearance depends on the theme. The button images may vary.
The first thing you have to do is to connect to a database, which will hold
your project. The system can deal with almost any database which has an ODBC
driver it also supports single-file SQLite
data base.
Press the button connect
![]() to
create a new project. This will prompt you with the type of the data base
connection, which can be selected at the tab:
to
create a new project. This will prompt you with the type of the data base
connection, which can be selected at the tab:
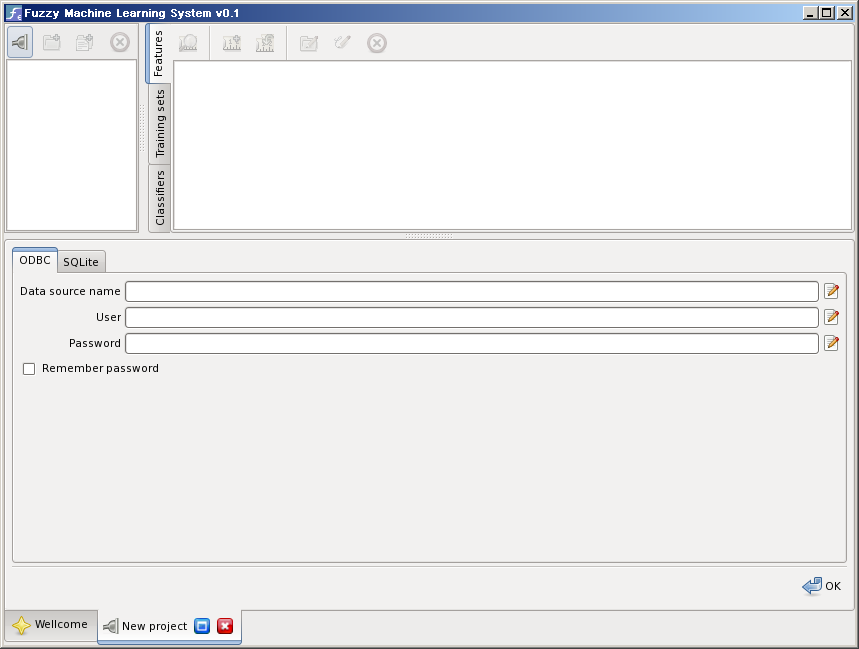
When you select an ODBC interfaced data base the connection description dialog contains fields: the name of the ODBC data source, the user and the password required to access the source. You should know these data come from your ODBC configuration:
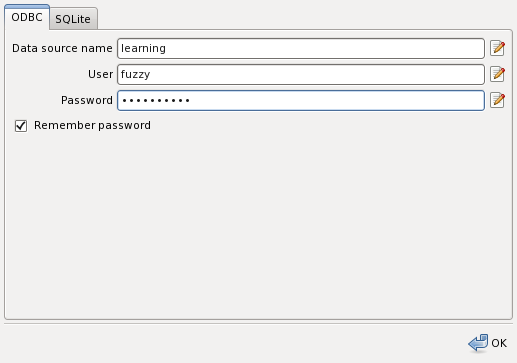
You have to configure your ODBC driver to have a data source mapped to the database. Also you have to create a database where the project will reside
It is possible to use virtually any database management system (DBMS) that supports ODBC. To name some widespread DBMS, which have ODBC drivers:
|
|
Refer to the DBMS documentation to learn how to create a database and configure access to it. The next step is to configure the ODBC driver defining a data source mapped to the database. Typically you would edit the odbc.ini file or call an administrative tool to create a data source corresponding to the database. Once you know the data source name and the credentials needed to access it you can proceed.
The check box remember password allows you to remember the password. If not checked the system will prompt you for the password each time you try to open the project. Once you have entered the data press the OK button
SQLite is a light-weight data base management system. Unlike typical data bases built on a client-server model SQLite does not require a server installed. The data base is kept in a single file. The data base connection dialog box looks like:
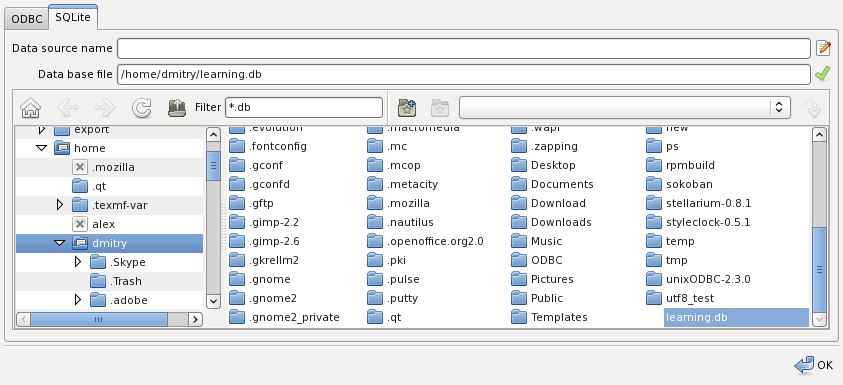
The field data source name is the project name. The data base file is the name of the file. When the data base name is relative it is to the selected directory. When the data base file does not exist, it is created. To open an existing data base file select it in the file selection box. Once you have entered the data base file name press the OK button.
Each project consists of three essential elements:
The pane on the right contains tabs for these three categories. They are sorted into the tabs for convenience.
The left pane contains the tree of projects and the subdirectories of. The root directories of the tree are projects backed by ODBC and SQLite data sources. The subdirectories can be created when necessary. They are stored in the corresponding data source.
The tabs in the lower half are used for displaying actions, like the data source
configuration we saw above. Or the greeting text. You can have many actions
active at once. For each such action there is a tab that indicates the
status of the action. An action can be canceled by clicking the button
![]() . The
action can be moved from the tab into a
separate floating window by clicking the button
. The
action can be moved from the tab into a
separate floating window by clicking the button
![]() . To
return the action indication back to a tab, the window is closed.
. To
return the action indication back to a tab, the window is closed.
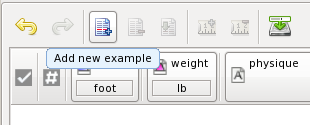
Next step is to create the features and classes you will work with. There are
many ways to create them. One of them is to do it manually. To do this press the feature
creation button
![]() on the features pane:
on the features pane:
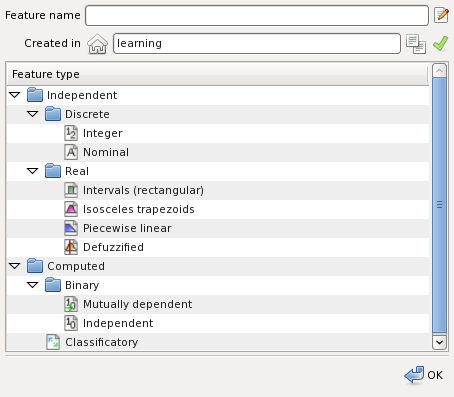
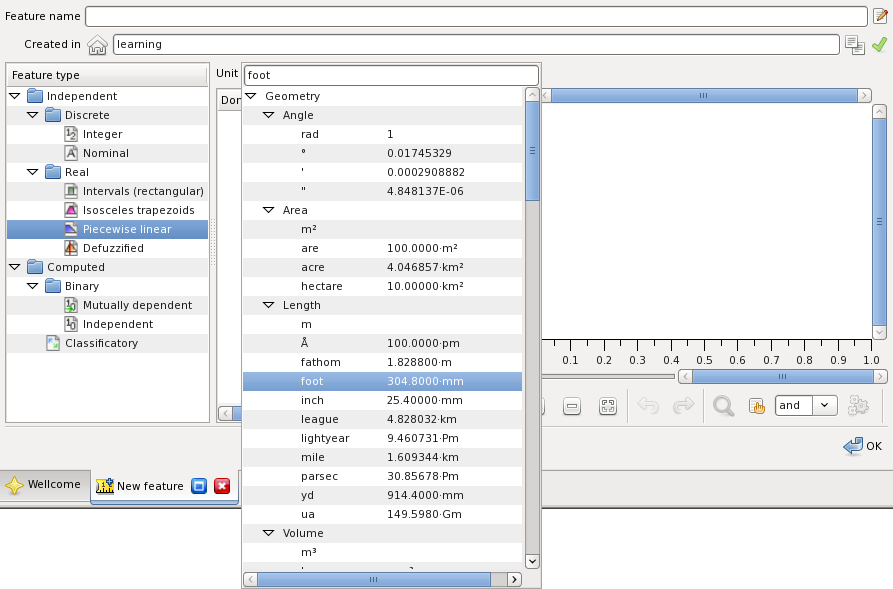
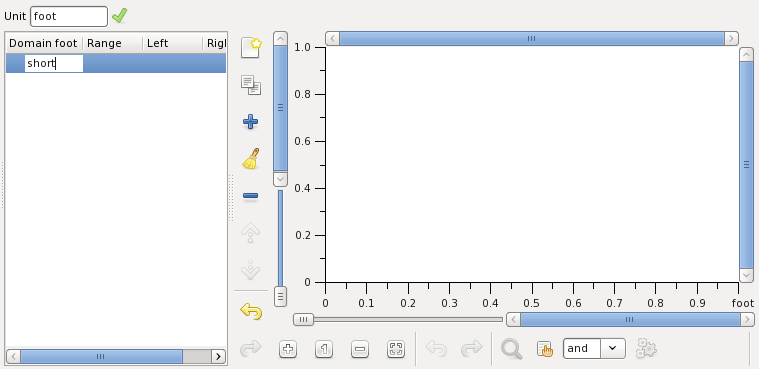
Select the feature type, for example, piecewise linear: Then select or else type the measurement unit for the feature, like foot:
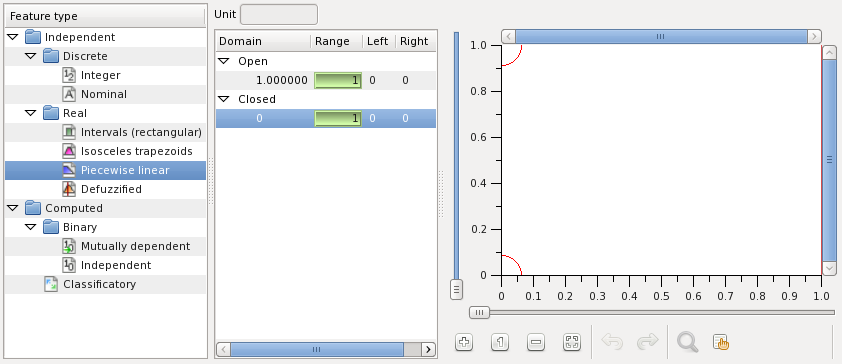
The feature values domain consists of linguistic variables with piecewise linear membership real functions. To create a variable press the button highlighted on the figure below:
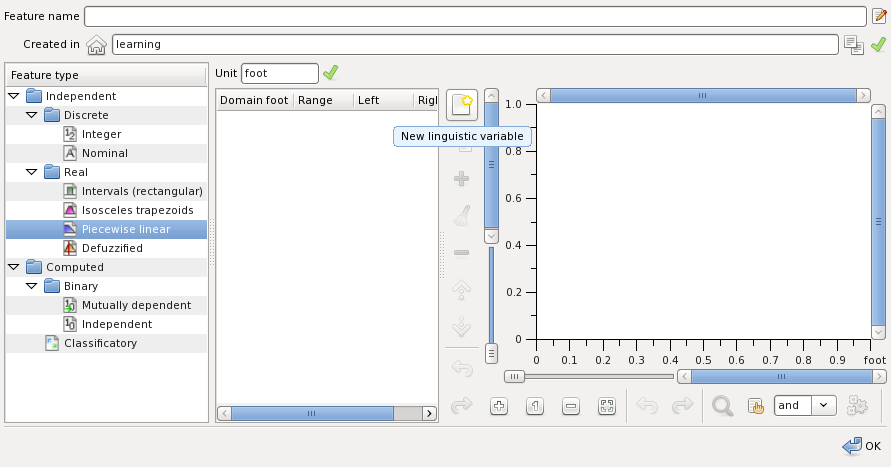
The panel on the left represents the list of variables and their the domain points. Once you created a linguistic variable it appears in the list left. Click at it and set the linguistic variable name to short:
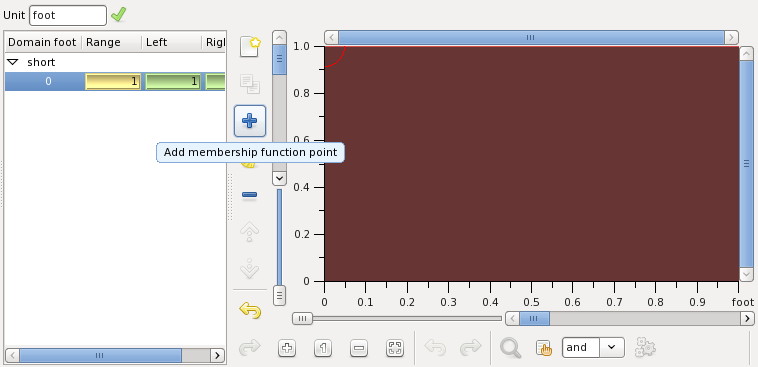
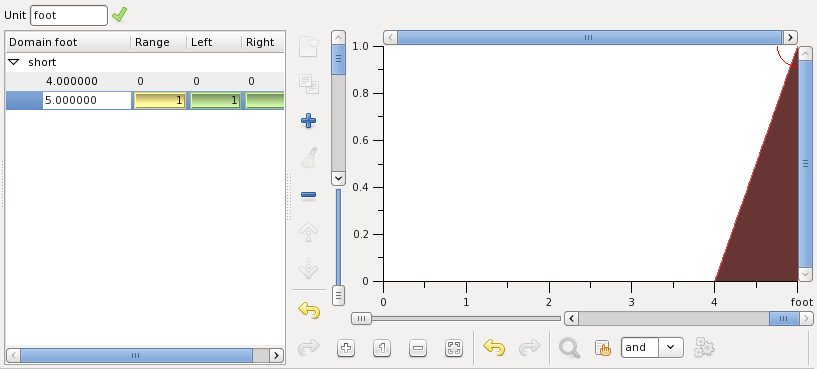
Proceed with defining the points of the membership function of the variable short: The membership function is linear between the points. To add a new point to the membership function press the button shown on the figure below:
Now you can see the membership function values in the point 0 foot, left of the point and right of it. Edit the point by setting it to 4 and the function values to 0. It must look like this:
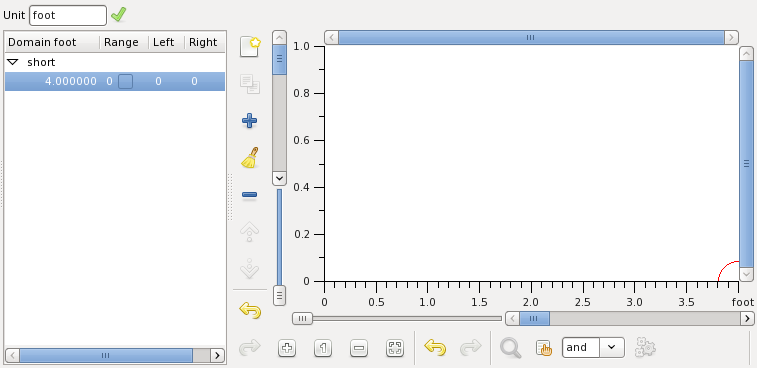
It reads that the membership function in 4 foot is 0 and the left and right limits of the membership function in this point are also 0. In the point the membership function can have a range of values rather than only one.
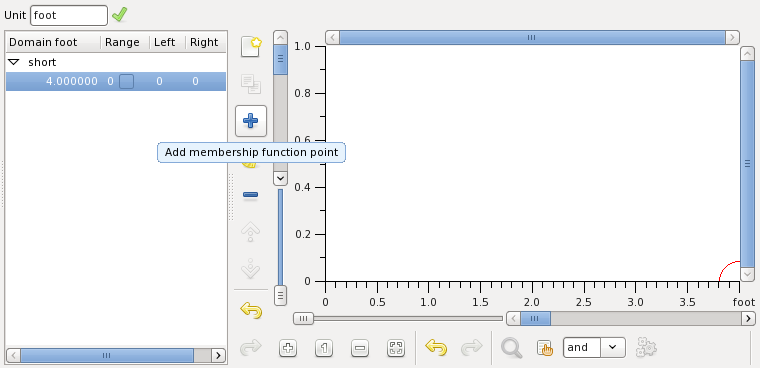
Add another point while the old point is selected:
Edit this new point to be at 5 foot with all values set to 1:
With two points defined you can see how the membership function begins to take shape in the graphic view, on the right. Now add next two points to complete the trapeze membership function of short:
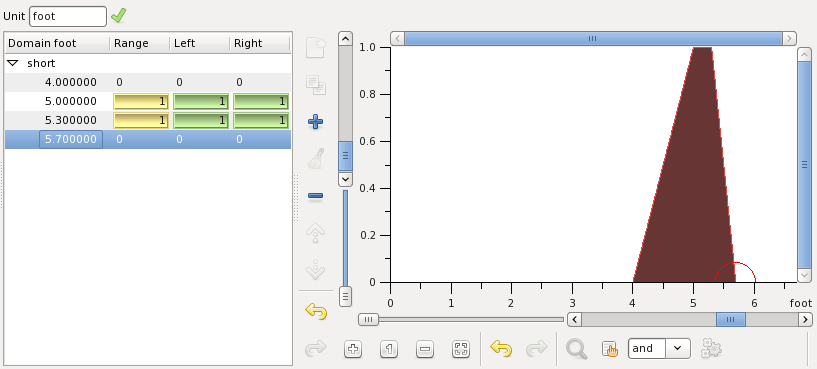
Note that the selected membership function point (on the left) is indicated by a red circle around it on the right. The vertical panel of buttons contains undo and redo buttons, which you can use while editing.
To add another linguistic variable. For this select the variable short to indicate the place where to add the new and then press the button highlighted on the figure below:
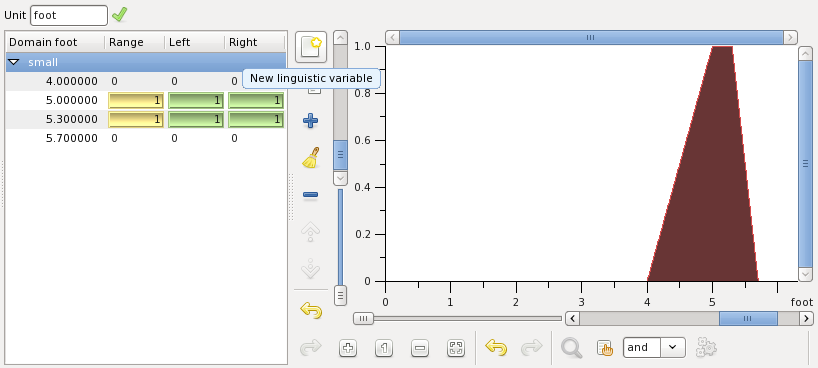
Edit the new variable very short adding points of its membership function to get this result:
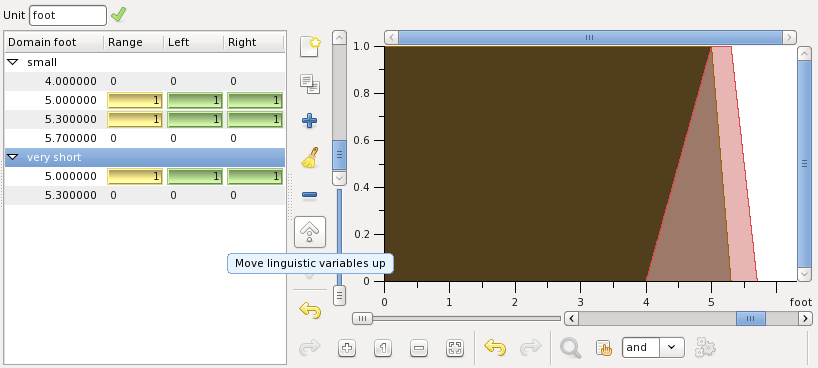
Logically very short should precede short. You can change the variables order by selecting them. Select very short and move it to the first position by pressing the button highlighted on the figure above.
Add other variables, normal, tall, very tall as shown below:
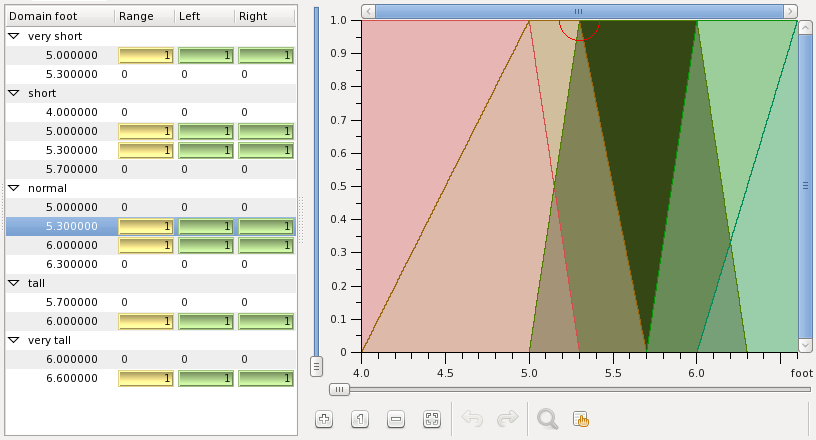
You can also adjust the point and its truth values visually, using the sliders as shown above. There are other buttons which allow zooming, sliding, undo, redo, and testing the result.
Now you are done with editing the new feature. Enter its name height and press the OK. Now you can see the feature in the features pane of the project learning.
Create another feature weight, now choosing the isosceles trapezoids type and filling the fields as shown:
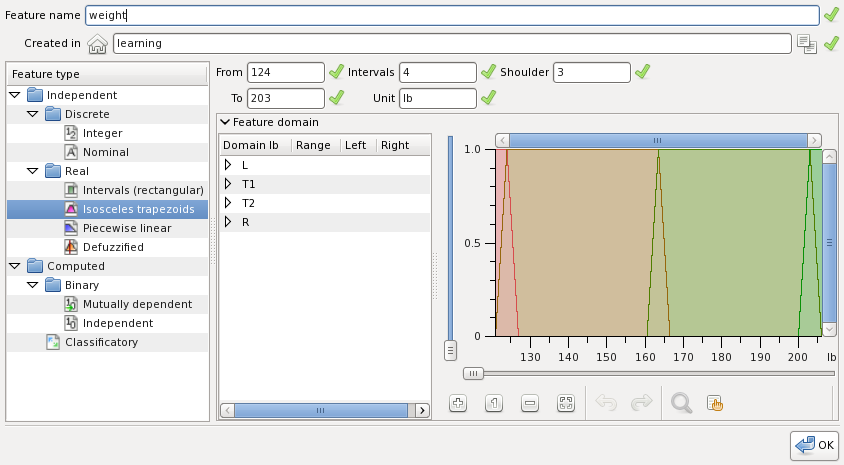
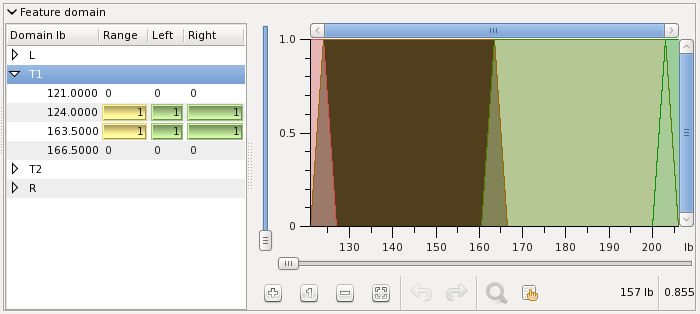
The fields from, to, intervals, unit and shoulder define four linguistic variables with the membership functions of isosceles trapezoids, except for the leftmost and rightmost shoulders. You can inspect the membership functions by selecting linguistic variables, as shown below, the selected membership function is highlighted. When you hover the mouse cursor over the graphical membership functions view you can read the axis right below. The buttons pane below is used no zoom in and out the graphical view. Zooming actions can be undo and redo.
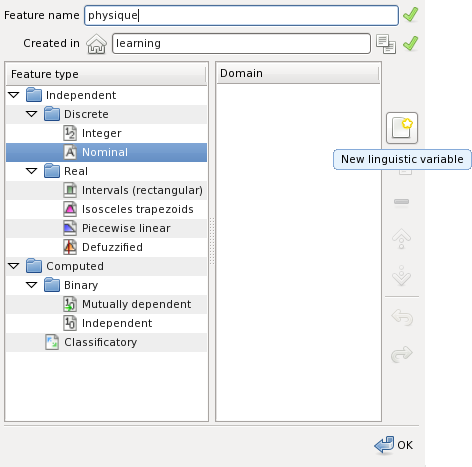
Create a nominal feature named physique. The nominal feature's domain is a list of names. Add a name by pressing the highlighted button shown on the figure below:
Edit the name, and add other names as shown below:
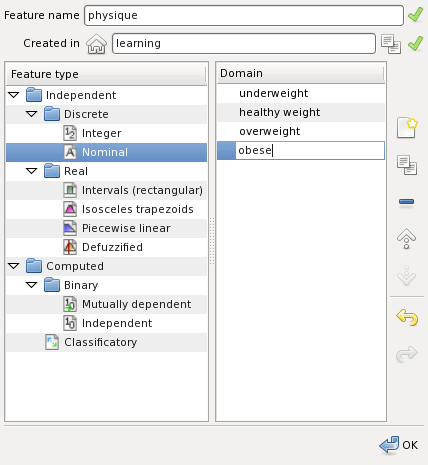
Create the feature physique pressing the OK button.
Now you have three features. When you select one of them in the pane further options will open:
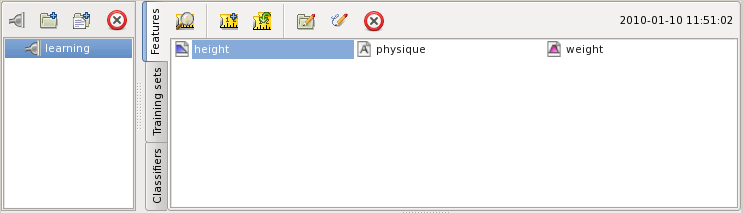
You can view, create copies, move, rename, and delete features. Each feature is stored in the database of the project. Note that other objects like features, training sets and classifiers may refer to a feature object. When referenced the feature cannot be completely deleted until it is in use. Some objects may allow deletion of the objects they depend on. Some do not. When deleted from the project's catalogue the feature or other referenced object remains invisible in the database until the last reference to it disappears.
The features you have created can be used for training. Let us use height and weight in order to classify into physique. I.e. the feature physique will serve as a class. In the fuzzy machine learning framework any feature can serve as a set of classes and any set of classes can be a feature. So you can build hierarchical and cascaded classifiers.
Switch to the tab of training
sets and press the button
![]() :
:
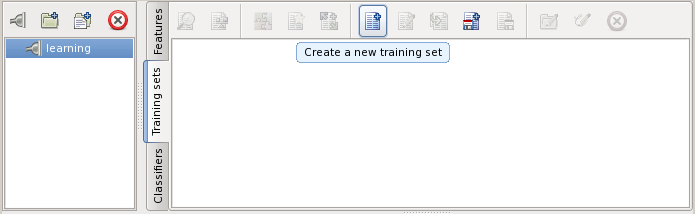
This will start editing a new empty training set.
The first step of editing the
set is to specify the features that the examples of the set define. Switch to the
features pane and select the feature height there. Then press the button
![]() in the editor window below.
in the editor window below.
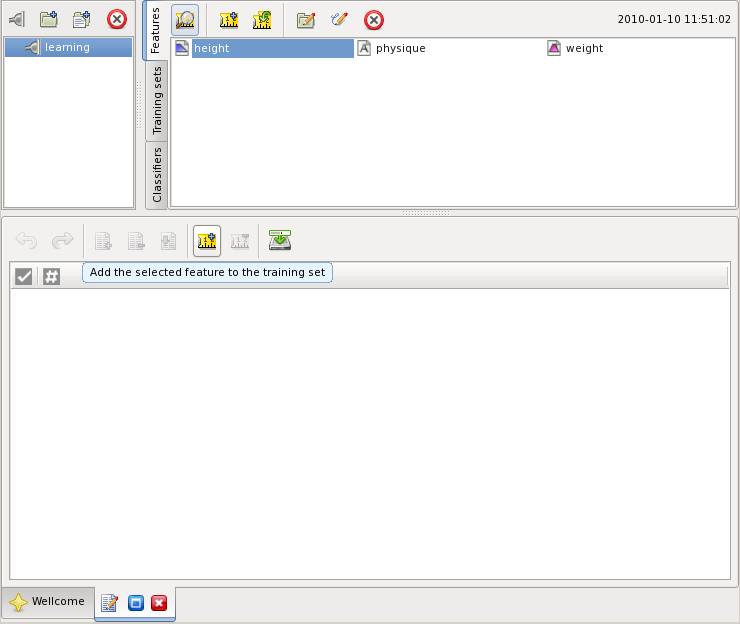
Add the features weight and physique in this order. Now the training set contains the features as shown below. You can see features as the columns in the training set view:
Positive and negative examples are related to the intutionistic approach, which the system consistently uses. In particular intuitionism does not take for granted the law of excluded middle. The positive training example describes some observed event classified by its features. In our case it can be a group of people. The height, weight and physique of these people are the classifications. A classification the group as tall, answers two questions
The intuitionism here is that being possibly tall, does not imply any necessity of being tall. The group is possibly tall when some of its people are tall. The most tall of them is taken for the group's representative. That is an estimation of the group's tallness from above. The group is necessarily tall when all its people are tall. The least tall of them gives us an estimation from below.
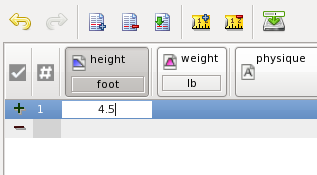
Add the first example pressing the button highlighted:
Click at the positive example's field height and type 4.5:
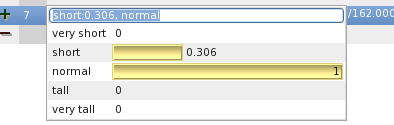
Type enter to complete input. The value 4.5 foot is fuzzified and stored into the example. When you click twice at the field you see the drop down box containing intuitionistic truth values of the corresponding linguistic variables of height:
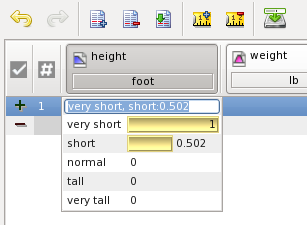
Here you see that 4.5 foot is [possibly and necessary] very short, and 0.5 [possibly and necessary] short. Note again, that this is a classifications, not an intuitionistic fuzzy set. I.e. 4.5 foot does not contain the set of very short people, it is contained in that set. The possibility of very short is 1, because the membership function of very short reaches 1 in 4.5. The necessity of very short is 0, because the complement of the membership function is 1 in 4.5. In other words 4.5 is fully contained by very short. For short 4.5 is contained to the degree of 0.5, that is the value of the membership function of short in 4.5.
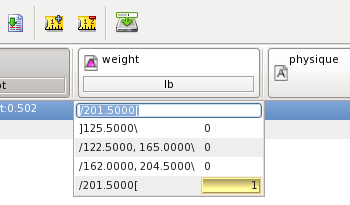
It is possible to enter intervals of values and dimensioned values, for instance type 250..300 for the feature weight and press enter. When you then control the input. note how the range 250..300 falls into single the category of the shoulder indicated as /201.5[lb. Here 201.5lb is the point of the shoulder where the truth value is 0.5:
Individual values of the classification can be edited directly. Click at the positive example's field physique. Choose the field obese type and type 1.
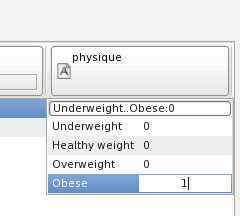
Type the enter key and close the box by typing the insert key. This will complete the positive training example that reads that 4.5 foot and 250..300 lb is obese.
Now the next row is the corresponding negative example. Such examples consider the complement of the positive example. In our case it is the rest of all people, those who are not in the observation group. According to intuitionism we cannot deduce a classification of this set. Thus if we knew something about it, that would be an additional information to learn from. If we don't know anything, we leave it as is.
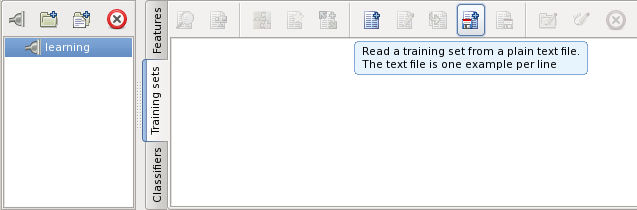
Editing of training set is finished by saving the set using the button save:
Manual creation of training sets might be very inconvenient even when sets are small. Instead of saving the set you can import it from a file. Create the following file:
-- Height Weight Physique
-------------------------------------
4.5; 250..300; Obese
1.8 m; 50 kg; Underweight
1.9 m; 170 kg; Healthy weight
1.5..1.8 m; 240..350; Obese
1.6 m; 50..65 kg; Healthy weight
1.7..1.9 m; 70 kg; Healthy weight
1.7 m; 90 kg; Overweight
Note that the values may be specified with measurement units compatible with ones of the corresponding feature. Press the highlighted button on the training sets pane:
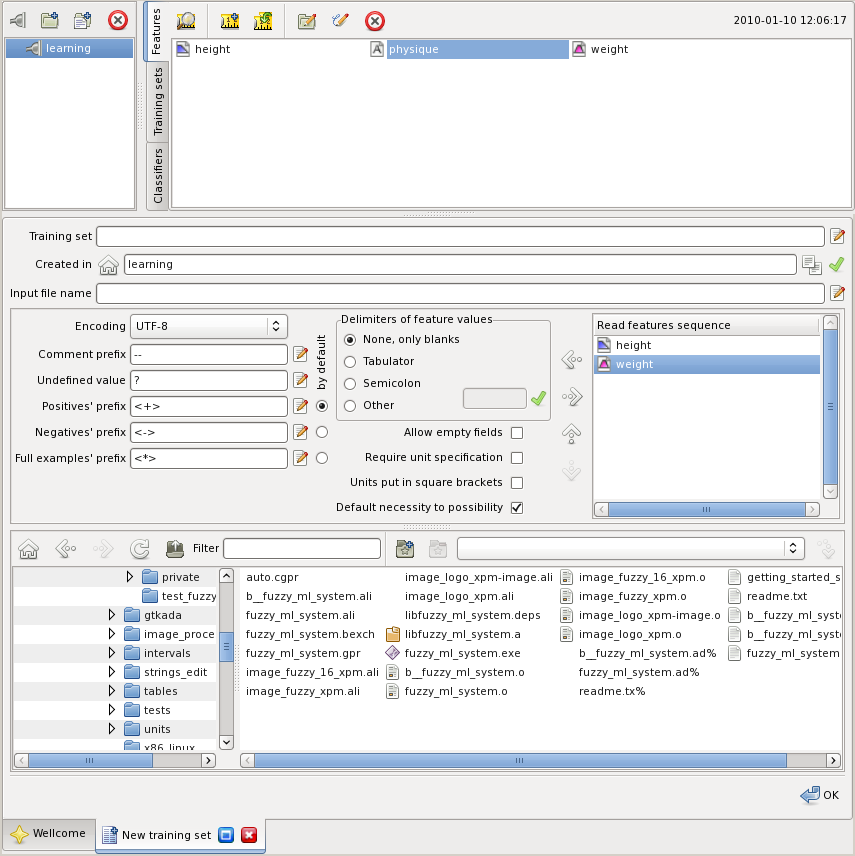
Edit the fields of the file import tab:
When the result set name is not specified you are prompted to enter it:
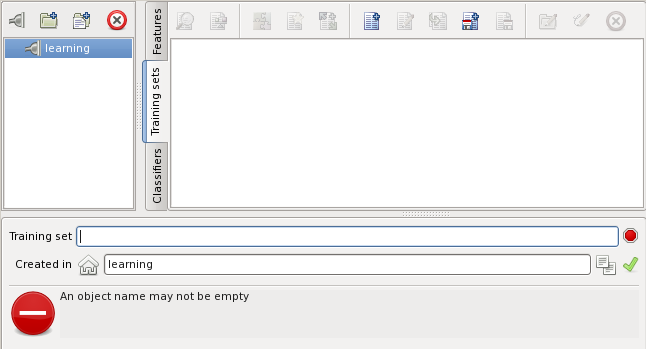
Enter the training set name test and hit OK.
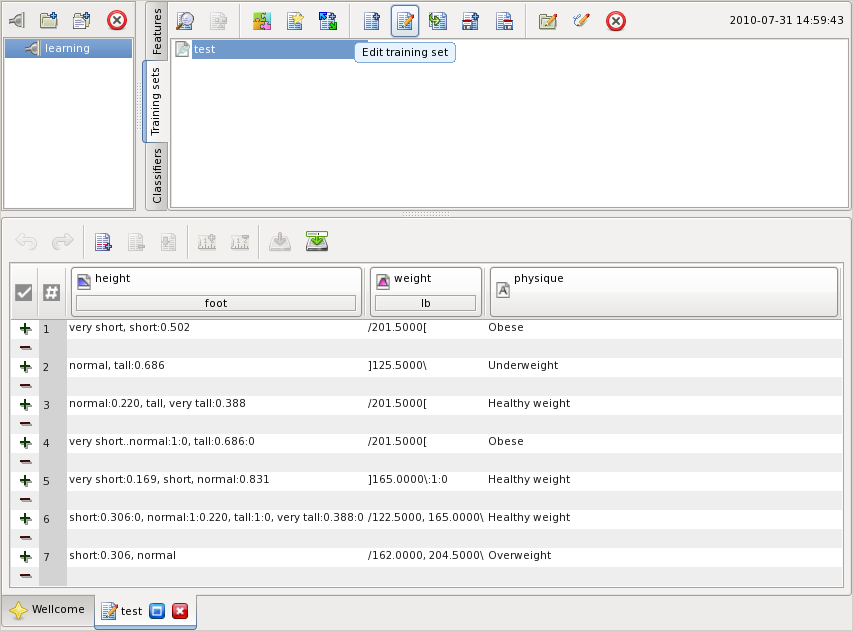
The training set can be viewed
or edited selecting it in the training sets pane and pressing the button
![]() or
or ![]() ,
correspondingly:
,
correspondingly:
Once a training set is created, it can be used for learning. Select the training set in the training sets pane and press the highlighted button:
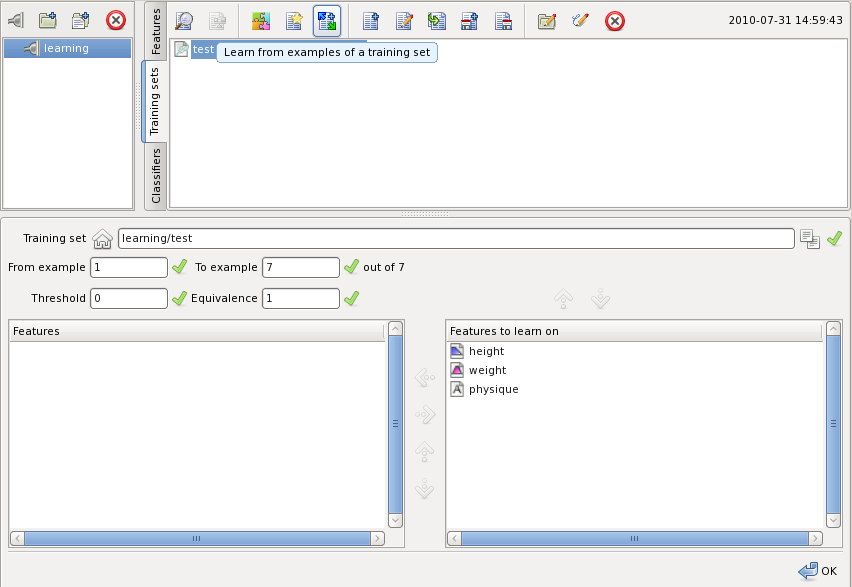
The fields are filled automatically to reasonable defaults:
Press the button OK to start training. While training you can monitor its progress. When it completes, you can repeat training with different parameters before you save the classifier.
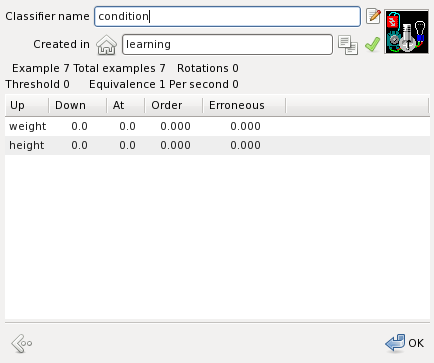
Enter the classifier name and press OK to store it.
The classifier can be inspected by selecting it in the classifiers pane and pressing the highlighted button:
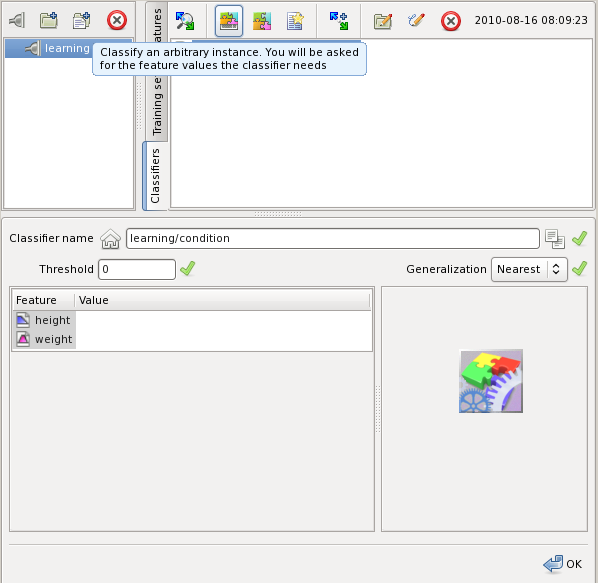
Now when the classifier is created it can be used to classify training sets and individual training examples. Press the highlighted button to classify an example input interactively without creating a set:
Type height to 1.5 m into height and 180 into weight. Then press OK to classify this example:
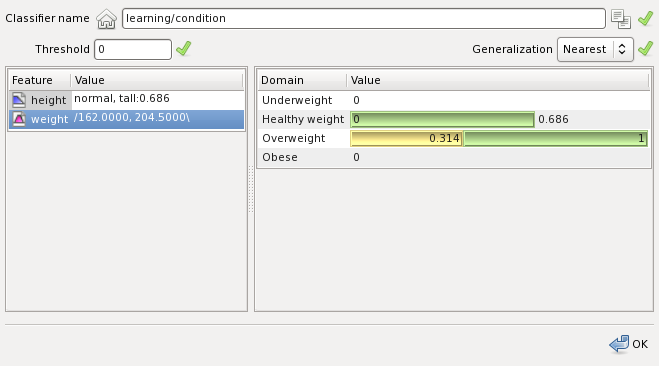
On the right the classification appears.
The elements requiring user input contains an indicator of the content.
![]()
The icon on the right of the field indicates:
The field is not yet edited. It maybe empty or else contain a default value The field is checked The field is errorneous
When possible the fields are checked automatically while typing. In some cases checks are delayed until the OK button is pressed.
The editing elements that require input of named objects have two additional buttons as shown below:
![]()
The field can be edited manually or else selected in a list of objects. When a valid object is selected the on the left button is enabled:
When button is pressed the name of the selected object is inserted into the field. The button on the right of the field is enabled when the field is checked. Pressing the button selects the object with the name from the field in the list.
A fuzzy values in an edit boxes can be entered directly. In this case the format of the input depends on the feature type. The nominal features can be specified by their names. The linguistic variables can be input using either the names of the variables or the values. When the support set of the linguistic feature is dimensioned the input value can be specified with a dimension compatible to it. For example, when 3 is entered for the feature height considered in above, the assumed dimension is foot. When the dimension is specified, it must be compatible with foot, like in 1.7 m.
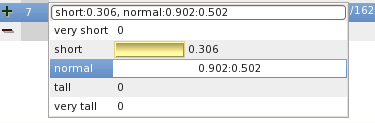
The edit boxes can be dropped down by clicking on the edit field:
The meaning of the bar's color:
The membership values of individual values of the feature domain can be edited individually as numbers, when clicked at:
The values can be edited visually using the following keys:
Alt +
- or
Alt +
< decreases possibility
Alt +
+ or
Alt +
> increases possibility
Ctrl +
- or
Ctrl +
< decreases necessity
Ctrl +
+ or
Ctrl +
> increases necessity
- or
< decreases both necessity and possibility
+ or
> increases both necessity and possibility
Editing is completed with:
Ins commits changes made and then closes the pop-up window
Del or
Backspace discards changes and then closes the pop-up window
The file and directory selection pane supports navigation undo buffer, directories bookmarks, files filtering and preview. The selection pane is shown below:
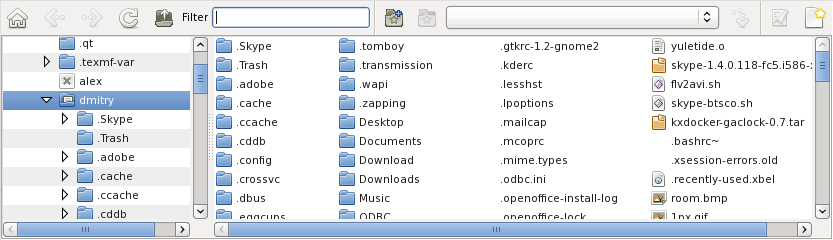
The left side of the pane is the directory view. The right side is the list of files in the directory selected on the right. The visual elements above are:
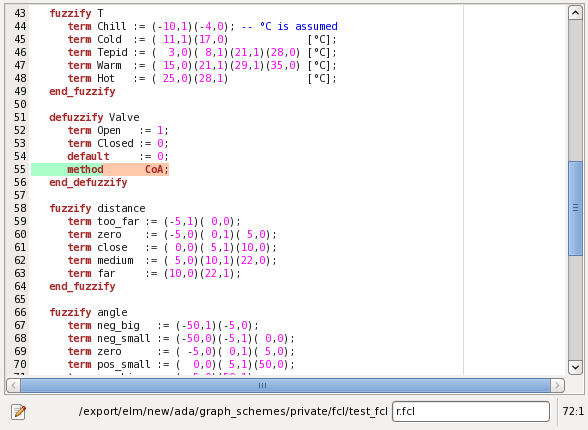
Upon file selection and on errors the source text file can be viewing in an file view pane:
The source file can be edited by pressing the button on the bottom left. The editor provides undo/redo buffer. The file name can be changed in the edit control on the bottom right.
The errors message is indicated at the bottom of the pane that caused the error. Errors are not blocking, messages are not modal. The figure below shows an example of error indication:
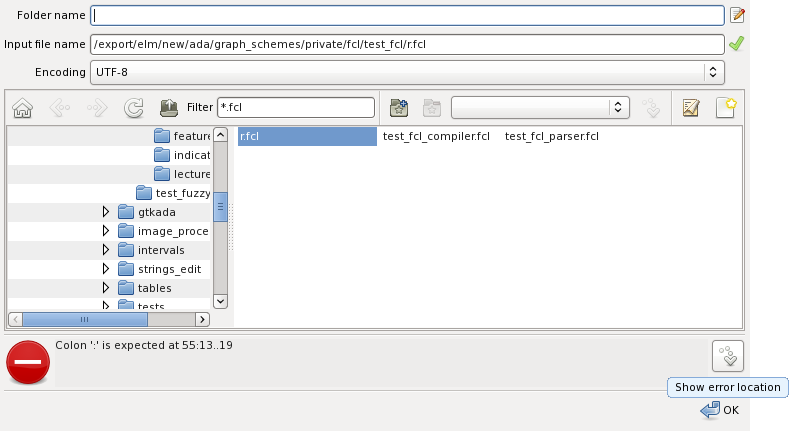
When the error source is in an external file. The show error location button is indicated as highlighted on the figure above. If pressed a file preview pane is opened with the error location highlighted as shown below:
A features is something that can be sensed and measured. A feature is fuzzy when the measurement process or the measured entity itself is not certain and the model if uncertainly is fuzziness. The fuzzy machine learning framework supports various types. Depending on the entity represented by the feature it can be discrete or real. According to the way the feature value is obtained it can be independent or dependent.
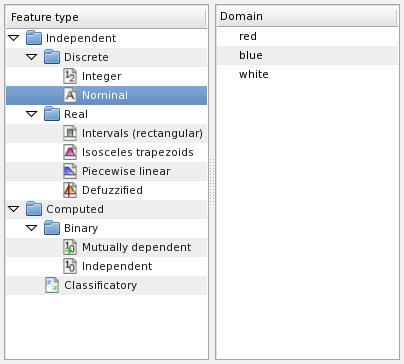
The domain of a nominal feature is a list of names. The following figure illustrates creation of a nominal feature:
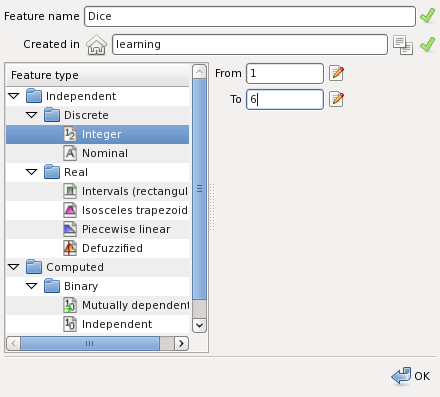
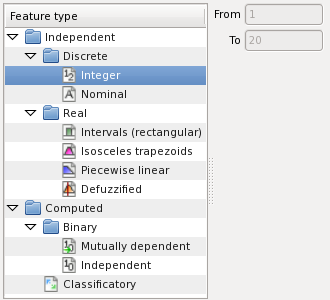
The domain of an integer feature is a range of integer numbers. The following figure illustrates creation of an integer feature:
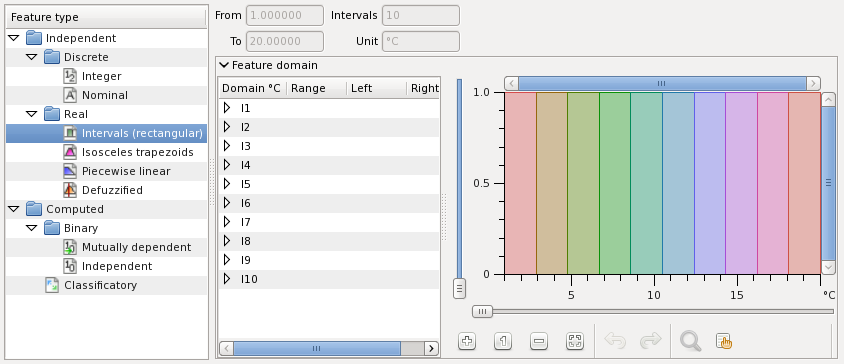
Interval valued features are real features. The domain values of the feature are linguistic variables with rectangular membership functions. The figure below shows creation panel of an interval-valued feature:
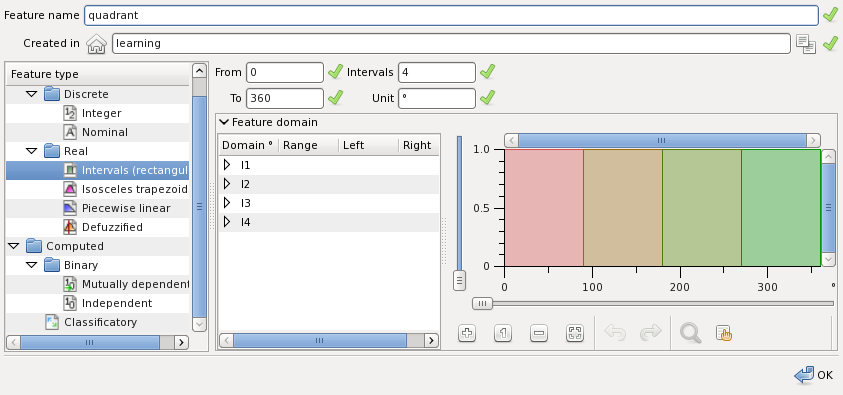
The fields required to define the feature are:
Isosceles trapezoid features are real features with the domain of linguistic variables which membership functions are isosceles trapezoids. The following figure illustrates creation of a such feature:
The fields required to define are:
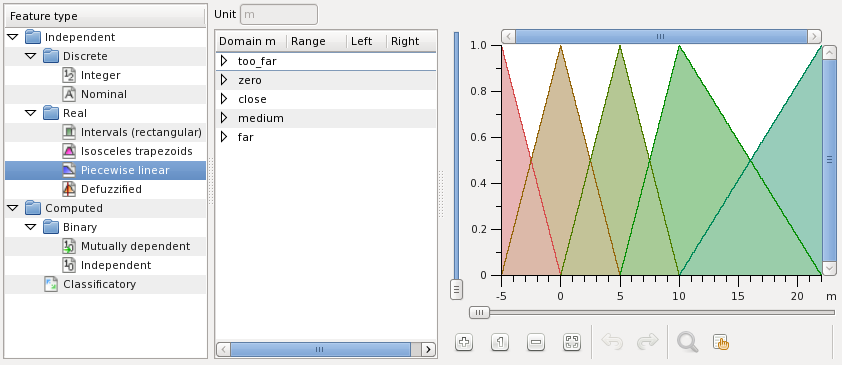
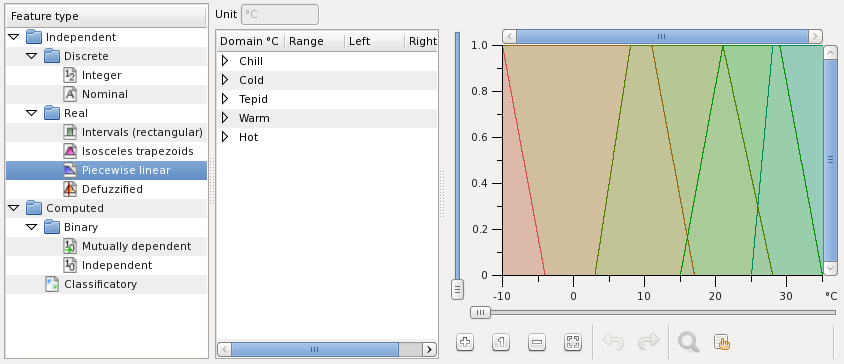
Piecewise linear valued features have the domain of linguistic variables which membership functions are piecewise linear. The following figure illustrates creation of a such feature:
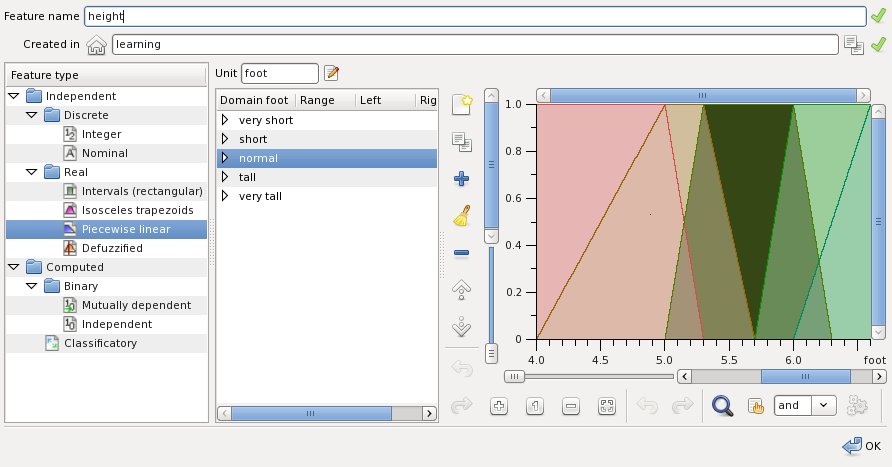
The membership functions are edited manually.
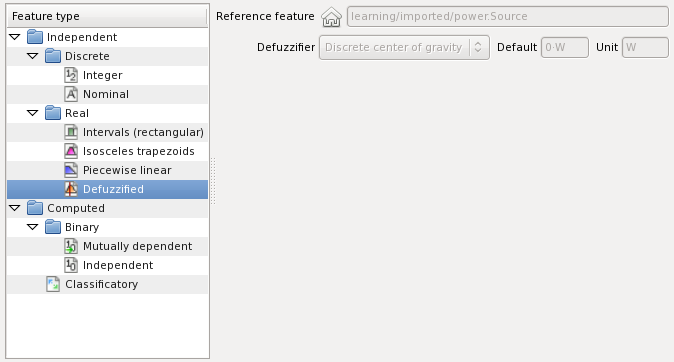
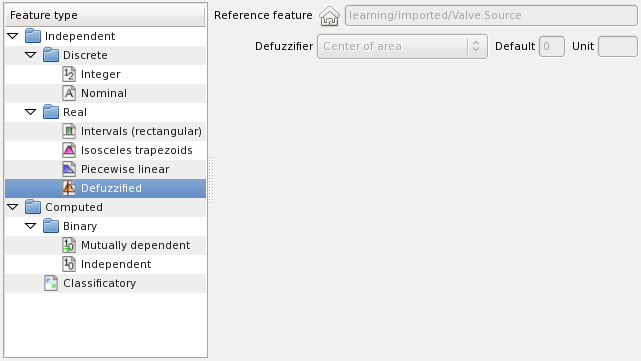
Defuzzified features are real computable features usually outputs of a fuzzy logic control system. Typically a fuzzy control system have to convert outputs into a crisp form understandable to the actuators. This process is called defuzzification. Defuzzified features are real features which apply a defuzzification method to a real reference feature. The domain of the defuzzified feature is a set of linguistic variables with pulse membership function. The following figure illustrates creation of a defuzzified feature:
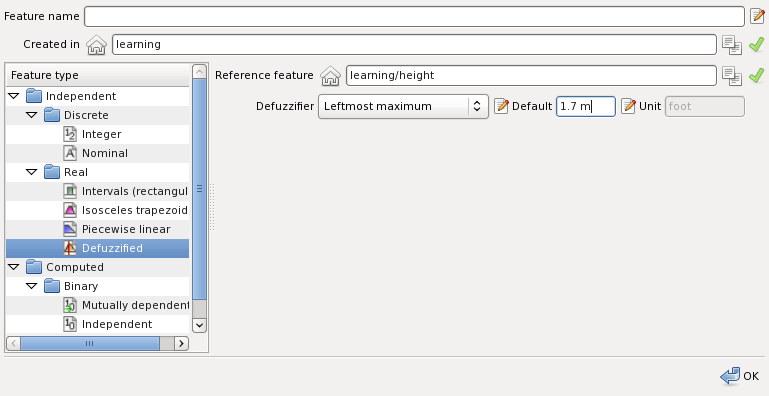
The fields required are:
The cardinality of the result feature domain is the cardinality of the reference feature.
Binary features are calculated features, with represent conditions like x≥2n, where x is the original feature value. Binary features can improve performance of the classifier in some cases. Creating a binary feature is shown on the figure below:
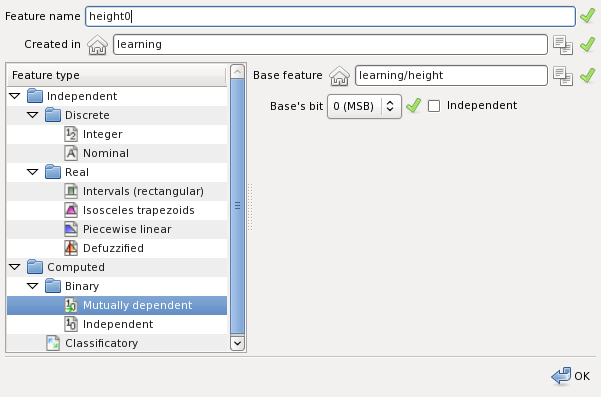
Here the feature height0 is created from the most significant bit of the feature height.
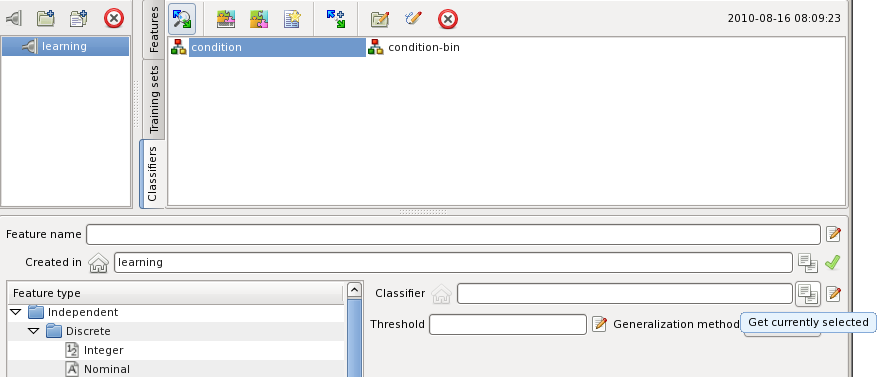
A classificatory feature is a computable feature which yields its values from a classifier. The feature value depends on the classifier and the values of the features the classifier uses. The domain set of a classificatory feature is one of the feature serving as the classes into which the classifier classifies. The following figure shows creation of the feature:

The following fields are required:
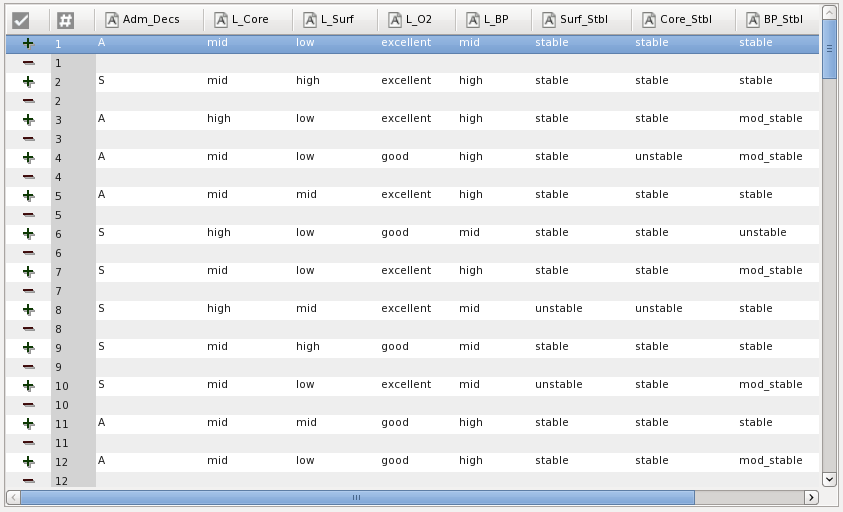
Training sets are collections of training examples. An example is set of feature values considered coherent, i.e. taken from some source, e.g. measured or assigned to some entity or group of entities. A training set can be used to train or verify a classifier on it.
The training set reading panel is open by selecting the training set and pressing the button highlighted below:
The training set has one line per training example. Features are specified in columns. The panel itself:
For the training set input the features sequence has to be specified and the file selected. Further options, which can be specified:
The Fuzzy Control Language (FCL) is a draft IEC 1131 standard for programmable controllers. A program in FCL describes input outputs and the rules to evaluate outputs from the inputs. A program in FCL is imported as follows:
The supported implementation of FCL is a fully functional and consistent subset of the draft extended in order to support intuitionistic fuzzy sets and measurement units. For a description of the extension see Fuzzy Control Language, an intuitionistic extension.
The following figure shows how a FCL file is imported:
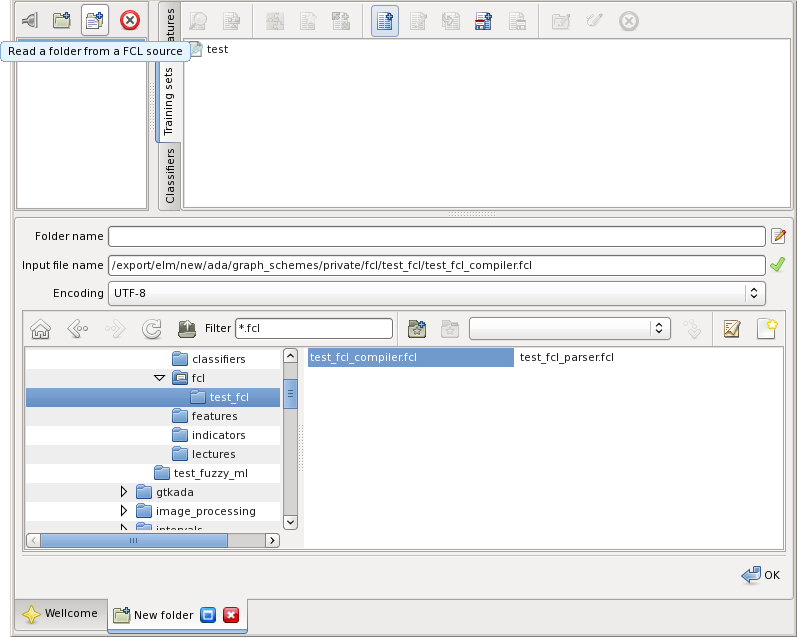
The preview button lets inspect the file:
The file is imported as a folder. The program name is suggested as the folder name. The program elements are created as objects in the folder. The inputs and outputs become features. The rules blocks do training sets.
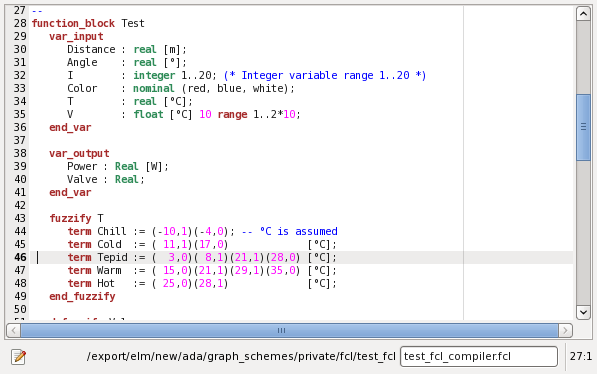
For instance the following FCL program:
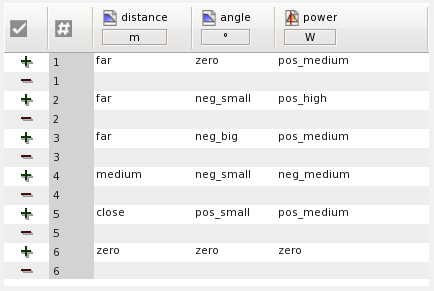
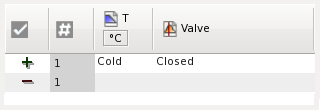
| function_block Test var_input Distance : real [m]; Angle : real [°]; I : integer 1..20; (* Integer variable range 1..20 *) Color : nominal (red, blue, white); T : real [°C]; V : float [°C] 10 range 1..2*10; end_var var_output Power : Real [W]; Valve : Real; end_var fuzzify T term Chill := (-10,1)(-4,0); -- °C is assumed term Cold := ( 11,1)(17,0) [°C]; term Tepid := ( 3,0)( 8,1)(21,1)(28,0) [°C]; term Warm := ( 15,0)(21,1)(29,1)(35,0) [°C]; term Hot := ( 25,0)(28,1) [°C]; end_fuzzify defuzzify Valve term Open := 1; term Closed := 0; default := 0; method : CoA; end_defuzzify fuzzify Distance term too_far := (-5,1)( 0,0); term zero := (-5,0)( 0,1)( 5,0); term close := ( 0,0)( 5,1)(10,0); term medium := ( 5,0)(10,1)(22,0); term far := (10,0)(22,1); end_fuzzify fuzzify Angle term neg_big := (-50,1)(-5,0); term neg_small := (-50,0)(-5,1)( 0,0); term zero := ( -5,0)( 0,1)( 5,0); term pos_small := ( 0,0)( 5,1)(50,0); term pos_big := ( 5,0)(50,1); end_fuzzify defuzzify Power term neg_high := -27; term neg_medium := -12; term zero := 0; term pos_medium := 12; term pos_high := 27; accu : MAX; method : COGS; default := 0; end_defuzzify ruleblock Rules and : MIN; if T is cold then Valve is closed; end_ruleblock ruleblock No1 and : MIN; rule 1: if distance is far and angle is zero then power is pos_medium; rule 2: if distance is far and angle is neg_small then power is pos_high; rule 3: if distance is far and angle is neg_big then power is pos_medium; rule 4: if distance is medium and angle is neg_small then power is neg_medium; rule 5: if distance is close and angle is pos_small then power is pos_medium; rule 6: if distance is zero and angle is zero then power is zero; end_ruleblock end_function_block |
When imported this FCL program will produce input features: Distance, Angle, I, Color, T, V.
Distance is a piecewise linear feature with five linguistic variables. The variables are defined over meters:
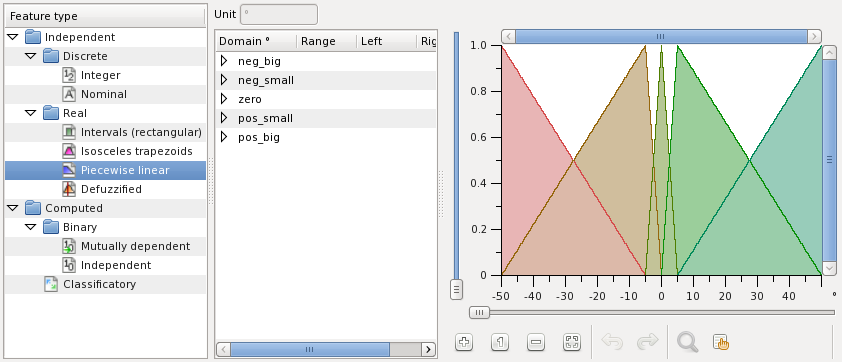
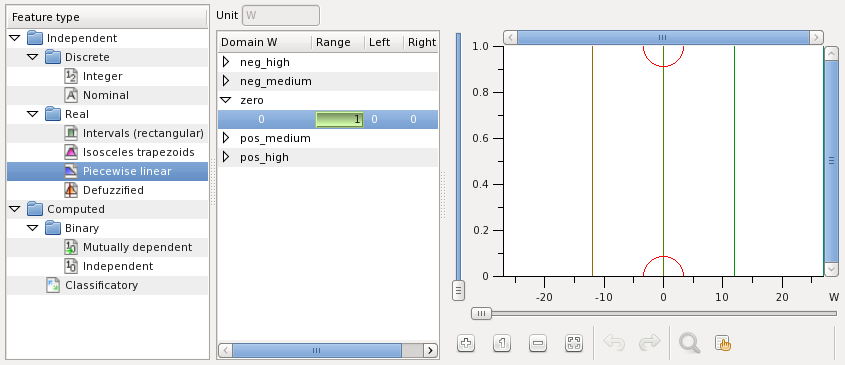
Angle is another piecewise linear feature measured in degrees:
I is and integer feature with the values from 1 to 20:
Color is a nominal feature:
T is a piecewise linear feature measured in Celsius degree:
V is a rectangular feature measured in Celsius degree:
Output features are Power.Source, Power, Valve.Source, Valve.
Power.Source is a feature of dimensioned singletons:
This feature is generated in order to implement defuzzification as required by the output Power. For this output a defuzzified feature Power is generated to defuzzify Power.Source into Watt using the method discrete center of gravity:
Valve.Source is a feature of two singletons:
This feature is defuzzified using Valve:
The rules blocks generate two training sets No1:
and Rules:
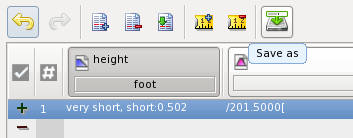
The training set writing panel is opened by selecting the set and pressing the highlighted button:
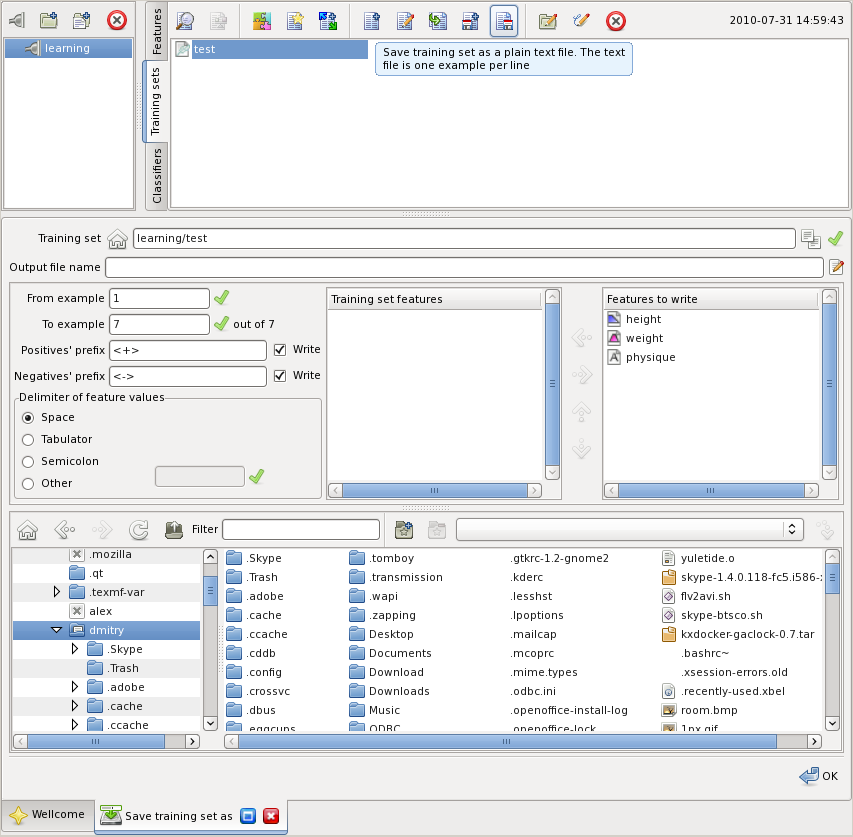
The training set is written one example per one or two lines. When both positive and negative parts of a training example are written it takes two lines. You can specify:
The example shown on the figure above writes test.txt as follows:
very short, short:0.502;/201.5000[;Obese
normal, tall:0.686;]125.5000\;Underweight
normal:0.220, tall, very tall:0.388;/201.5000[;Healthy weight
very short..normal:1:0, tall:0.686:0;/201.5000[;Obese
very short:0.169, short, normal:0.831;]165.0000\:1:0;Healthy weight
short:0.306:0, normal:1:0.220, tall:1:0, very tall:0.388:0;/122.5000, 165.0000\;Healthy weight
short:0.306, normal;/162.0000, 204.5000\;Overweight
Classifiers are objects encapsulating a classification algorithm adjusted on some set of examples.
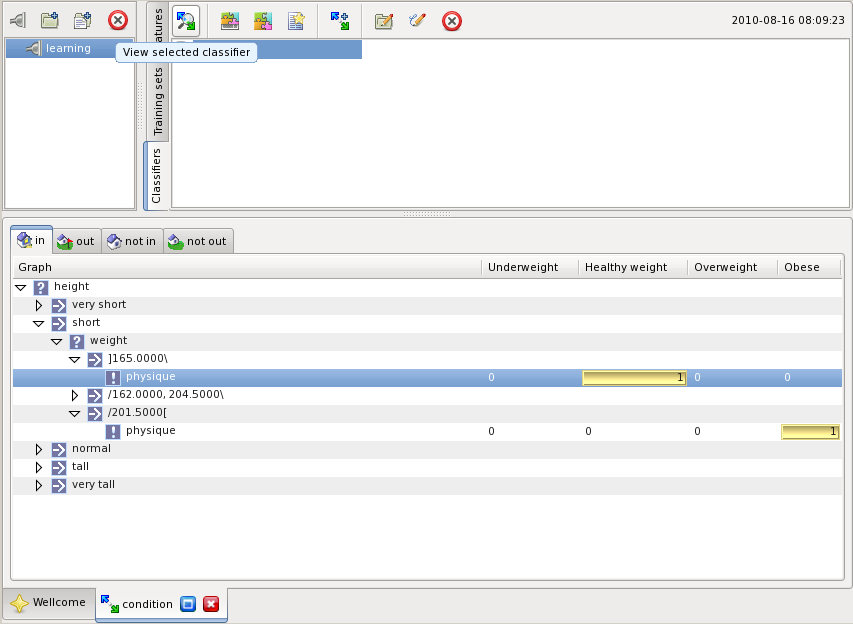
A classifier can be viewed pressing the button highlighted on the figure below:
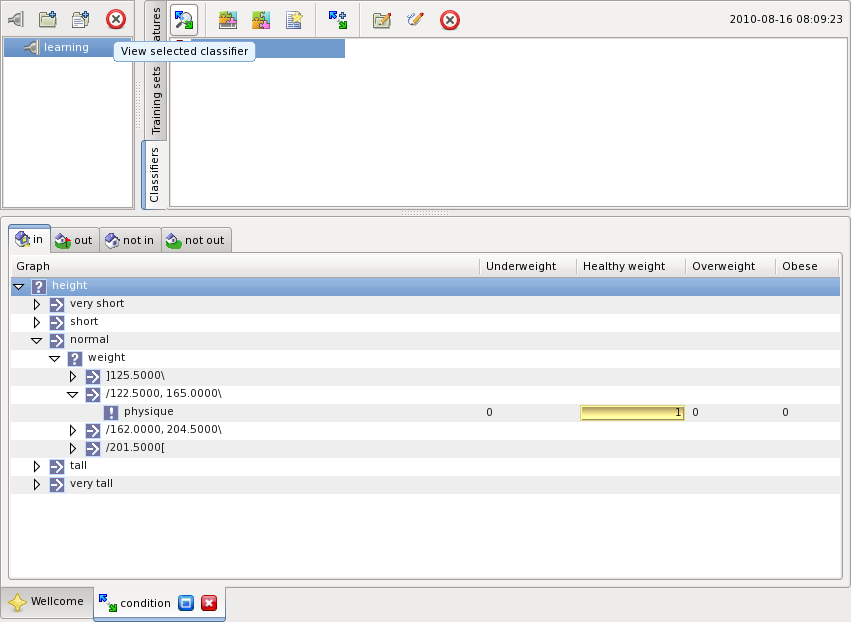
When the classifier is based on a graph-scheme it consists of four graphs represented on the tabs:
The graphs are shown as trees. The tree nodes indicate graph nodes testing a feature. The branches leading out of the node are indicated as children marked by the transition conditions. The leaf nodes represent classifications. The classification indicated in the columns on the right.
The examples of a training set can be classified by a classifier by selecting them as shown on the figure below:
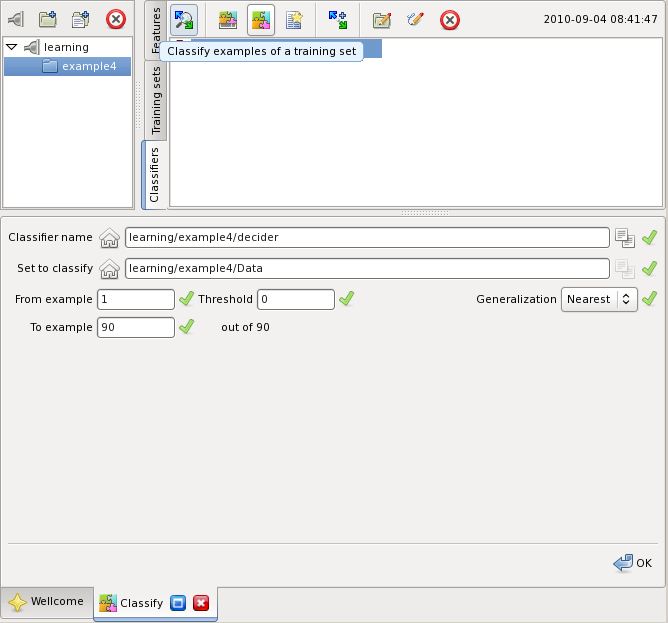
The panel allows selection of the examples range to classify and the classification parameters:
Once the classification is completed, the panel shows the result and the classified training set as shown on the figure below:
A classifier can be used for examples manually edited rather from a specific training set. The following figure shows how to use this mode:
When in the panel the features the classifier would test can be given desired values and then the classifier can be applied by pressing the OK button. The process can be repeated as necessary.
Usually a classifier is trained on some training set and then verified on another. When there is only one set it is split into parts, one to train another is to verify. The following figure illustrates how to verify a classifier:
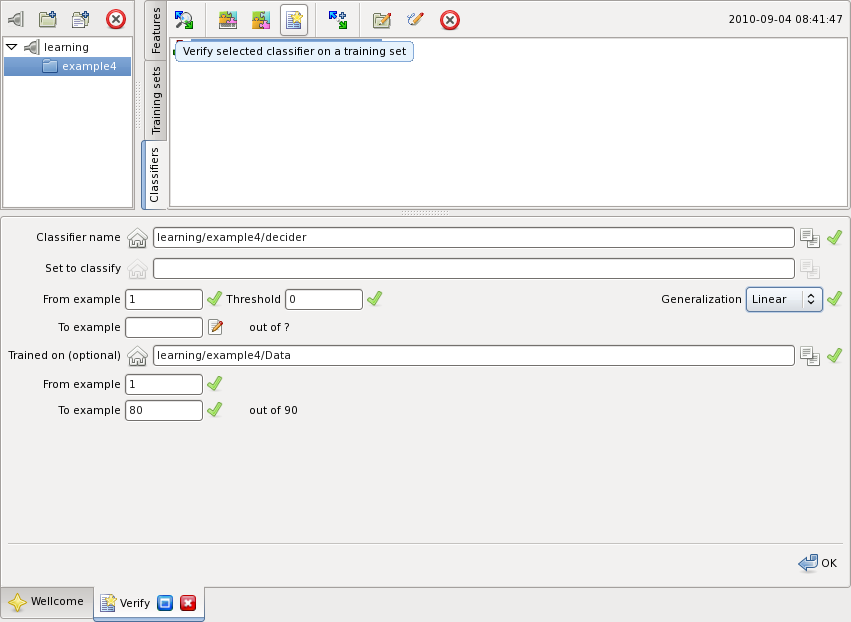
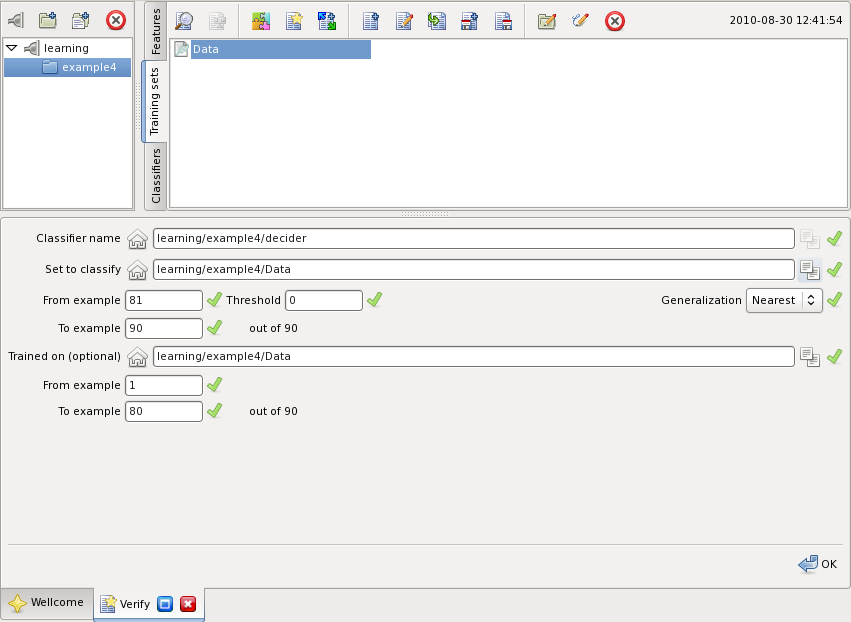
It is possible to verify on the same set. As shown below, a range of examples from the classified set is selected for verification:
The training set used during learning is optional. When specified the verification panel provides explanation means. The verification report panel is represented on the figure below:
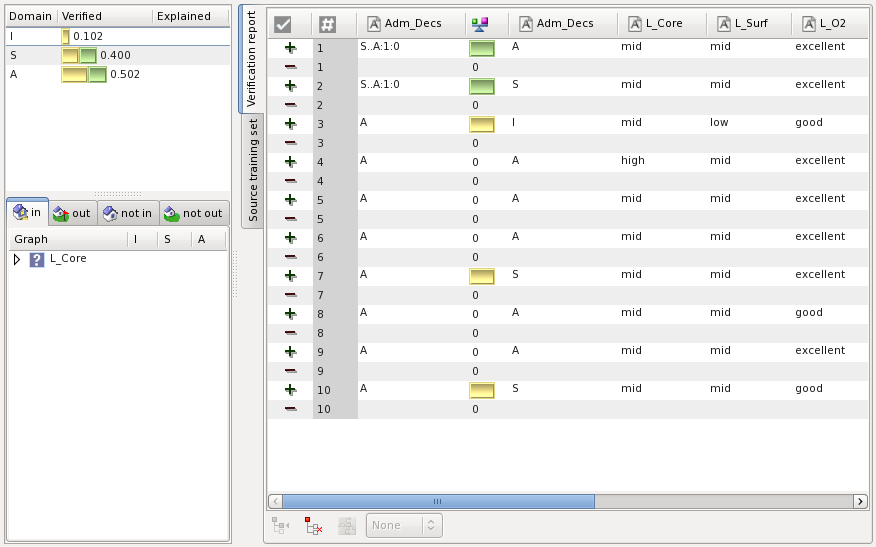
The left part of the panel contains the verification statistics. The mean of the classification errors shown for each class separately above. The classifier is shown below. The right part of the panel contains the detailed verification report. It lists the control set examples. The third column contains the classification provided the classifier. The fifth column does the classification stated by the control set. The fourth column is the difference between these two. When the source set was specified the right part of the panel contains a tab indicating it.
The verification report provides an elaborated explanation support.
Partial classification is a tool to analyze how parts of the classifier influence the classification result for the given example of the control set. Select a training example from the control set and some part of the classifier as shown on the figure below, and then press the highlighted button:
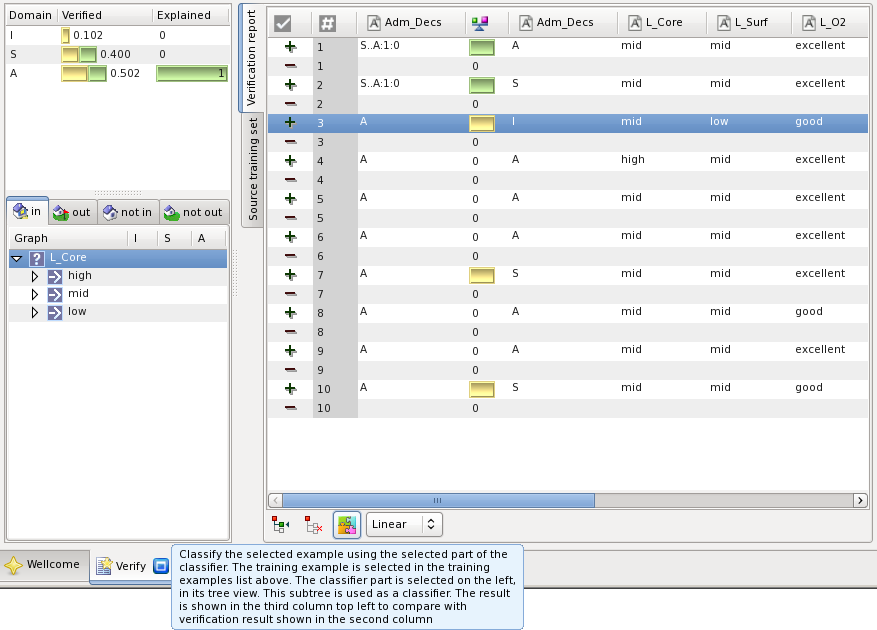
The result of classification of the selected example by the selected part of the classifier is shown in the column Explained on the left upper part of the panel.
It might be interesting to known which parts of the classifier actually contribute the classification of an example. When the example is selected press the button highlighted on the figure below:

This will collapse the parts of the classifier that do not inspect the example while classifying it, and expand those which do contribute to the result.
When the source set was specified you can track the examples, which lead to construction of the given part of the classifier. Select the classifier part and then press the button highlighted on the figure below:
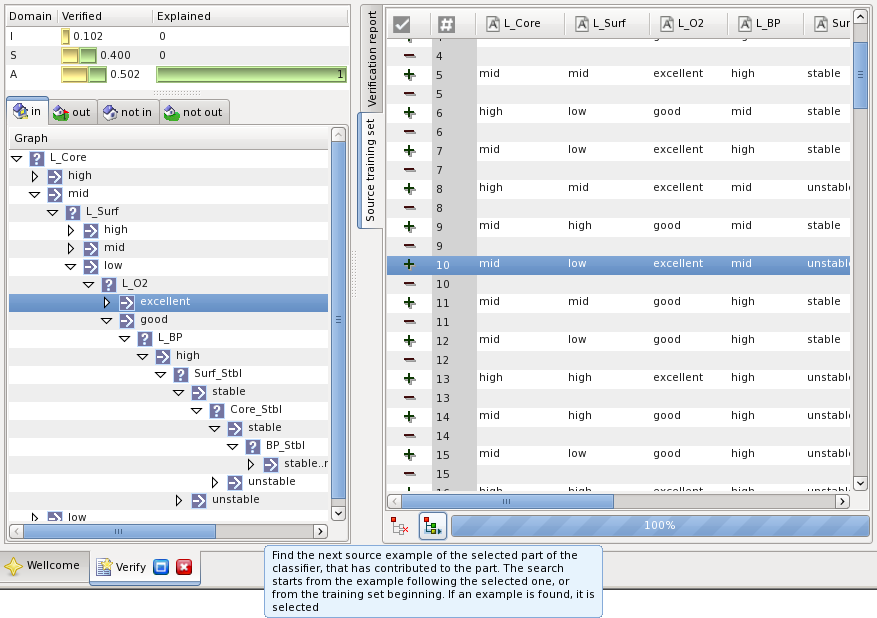
This will select the next training example in the source training set, which contributed to construction of the selected part of the classifier.
A classifier can be created by training on a set of examples. The following figure illustrates creation of a classifier:
The fields to specify are:
The graphical user interface requires no special installation. The executable file can be used as is.
The executable file is dynamically linked to the GTK (gtk, glib, gobject etc) and gtksourceview libraries. The packages providing these libraries must be properly installed on the computer.
For colorization of the *.fcl files you might wish to copy the fcl.lang file to /usr/share/gtksourceview-2.0/language-specs.